The Mix It Up overlay allows you to display visuals on your stream in the form of Overlay Actions and Overlay Widgets. This includes things such as images, videos, text, widgets on screen. By default, the Mix It Up Overlay is already enabled when you create a new profile for the first time. But you can manually enable or disable it by heading to Services -> Overlay in Mix It Up.
When adding the Overlay to your streaming software, the following are the recommend steps for to ensure the Overlay is properly configured. Failure to follow all these steps could result is connectivity issues with the Overlay and visuals not being displayed properly or at all:
- Create a new browser source in your streaming software with the following settings:
- Add the URL for the Overlay. The Default Overlay URL is
http://localhost:8111/overlay/ - Set the resolution of your browser source to match your stream output (EX: 1920x1080)
- Enable both “Shutdown source when not visible” & “Refresh browser when scene becomes active” options
- Add the URL for the Overlay. The Default Overlay URL is
- Click on the “Test Connection” button in Mix It Up to check if the Overlay is properly connected.
Overlay Endpoints
An Overlay Endpoint is a unique URL that can display Overlay visuals. Most users only need one overlay endpoint, the Default Overlay Endpoint, but you can optionally add multiple Overlay Endpoints to support showing different content in different scenarios. Some examples of this include handlnig green screen effects or being able to control the audio output of an Overlay Endpoint within the web browser source in your streaming software. Overlay Endpoints can be changed by visiting Settings -> Overlay.

The Port Number for the Overlay service as a whole can be configured here. All Overlay Endpoints share the same port number and will all change when this is updated. For most users, you will not need to change this, but it can be changed if the port number conflicts with another application that is using the same port number.
Each Overlay Endpoint has a name and a unique URL. The URL can be accessed by clicking on the open button (first button) to open the URL in your regular web browser or clicking on the copy button (second button) to copy the URL to the clipboard. Overlay Widgets can also be removed by hitting the trash can icon (fourth button). Note that deleting an Overlay Endpoint without changing any Overlay Actions or Overlay Widgets that use it can cause some to either not work or be assigned to the Default Overlay Endpoint.
Overlay Endpoints can also be edited (third button) to include custom HTML, CSS, and Javascript. Anything added will be present on all Overlay Actions and Overlay Widgets that use that Overlay Endpoint. This can be particularly useful for things like CSS or Javascript code that you want to make available to several different Overlay Action and Overlay Widgets without having to copy it into every single one.
Accessing Local Files In Overlay Code
Overlay Actions and Overlay Widgets that involve media (images, videos) will automatically handle loading in and displaying the media on the Overlay. The Overlay does not have the ability to directly access local files on your computer due to security measures with how web pages are loaded. However, there are some times where you need to access multiple files at once in a single Overlay Action or Overlay Widget. This can be done by using the LocalFile property in your Overlay Action or Overlay Widget code (HTML, CSS, or Javascript).
By putting {LocalFile:\\FILE_PATH} in your HTML, CSS, or Javascript, the Overlay service will handle automatically translating this to URL reference which can be properly loaded in to the overlay. For example, if I wanted to access the file C:\Foo\Bar.png, I would put the following in the code:
{LocalFile:\\C:\Foo\Bar.png}
This can then be used inside various HTML, CSS, or Javascript code. Below is an example of how this could be used to display the image using an tag:
<img src="{LocalFile:\\C:\Foo\Bar.png}" />
Common Troubleshooting Steps
When running into issues, make sure to check the following:
-
Make sure Mix It Up is started first before your streaming software, otherwise the Overlay “won’t exist”, so it won’t load properly.
-
Head to the Services page in the application and ensure that the Overlay service is connected.
-
In your streaming software:
- Make sure the resolution of your browser source is set to match your stream output (EX: 1920x1080)
- Ensure the options “Shutdown source when not visible” & “Refresh browser when scene becomes active” are checked.
- Press on the “Refresh cache of current page” button and then save.
-
Hit it the Test Connection button under Services -> Overlay and make sure you see the red “Connection Test!” text appear on the overlay.
-
There is a known issue with OBS Studio 31 that can cause videos, audio, & images shown on the Overlay to freeze or get stuck. This has been reported to the OBS Studio team for investigation, but there is no known solution currently other than refreshing the Overlay when it occurs or downgrading to OBS Studio 30. More information about the issue in OBS Studio can be found below:
-
Certain games have been known to cause issues with the Overlay staying properly connected. These issues have been reported to the developers of said game, but no specific resolution has been found. Below are a list of the games that have known issues with the Overlay:
- Marvel Rivals
- Once Human
- FragPunk
- Any game published by NetEase Games
Additionally, if you are also using OBS Studio, XSplit, or Streamlabs OBS connectivity in Mix It Up, you can specify the name of the web browser source that is hosting the Mix It Up overlay. We will automatically refresh that source when Mix It Up loads in-case it was opened after your streaming software.
Browser Source Hardware Acceleration
Some streaming softwares come with an updated version of the browser source which includes a hardware acceleration setting. This setting allows the browser source to be rendered on the GPU; however, there are cases beyond the control of Mix It Up where your streaming software cannot render the content of your browser source (EX: Freezing/Laggy videos). When diagnosing issues related to videos lagging or stopping on your overlay, check to see if this option is enabled or disabled in Settings -> Advanced. Flip the setting (Enabled -> Disabled or Disabled -> Enabled), then restart your streaming software and check if the issue is resolved.

Windows Settings: Overlay Animation Issue
If you have seen a warning from Mix It Up and need to check the windows settings to ensure your animations work correctly, then follow these steps:
Try this first (Windows 10/11):
- Open Windows Settings (Windows Key + I)
- Go to Accessibility → Visual effects
- Make sure Animation effects is turned On
- Restart Mix It Up
If that doesn’t work, use the legacy Performance Options:
- Press the Windows Key+R - This opens the Run window like this
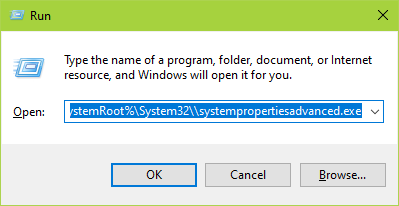
- Now paste this into the Run window:
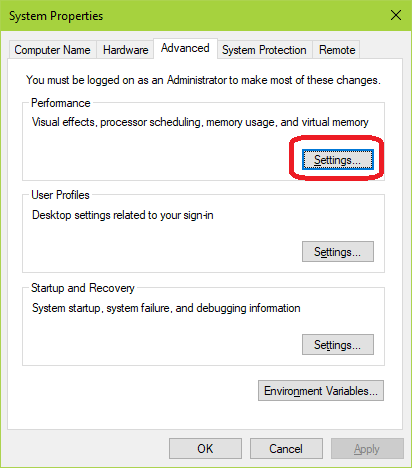
%SystemRoot%\System32\systempropertiesadvanced.exe - You should see this window show up, click the Settings button in the Performance section:
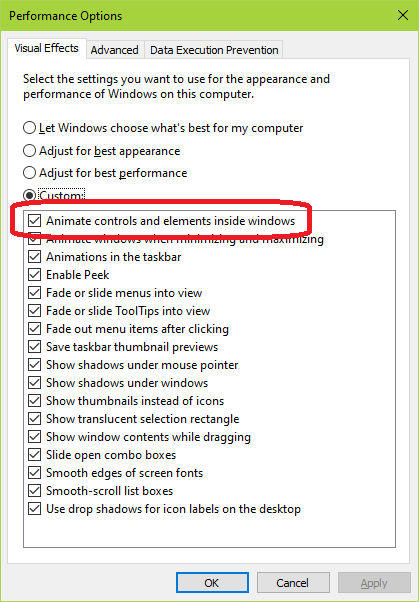
- In the Performance Options window that shows up, confirm that the
Animate controls and elements inside windowsis checked:
Note: After changing either setting, you must restart Mix It Up for the changes to take effect.
Access the Overlay from another local PC
If you have a multi-PC stream setup where your streaming software runs on a different PC than Mix It Up, you can access the Overlay from the Mix It Up PC by performing the following steps:
- Launch Mix It Up in Administrator mode (Right-click -> Run as Administrator)
- If both of your PCs are connected to the same router, you can allow an inbound connection to the PC running Mix It Up via Windows Firewall. You’ll want to select Inbound Rules -> New Rule, set the rule to type to TCP and set the port number to match the port number of the Overlay service (typically 8111)

- If two PCs are not connected to the same router, you’ll additionally need to port forward the Overlay from the Mix It Up PC so it can be access on other PCs within your local network. This step will be unique to the router/modem you are using.
v1.2 Overlay Update
This update introduces large-scale changes to all Overlay functionality throughout the application and includes some breaking changes. As such, we recommend NOT updating immediately before a stream and waiting until you have time to walkthrough all of the changes and ensure your Overlay setup and interactions are configured to your liking. Below are some of the breaking changes that are introduced in this update:
- All Overlay Endpoints now share the same port number and instead have unique URLs associated with them. If you use more than 1 Overlay Endpoint, you will need to update the web browser sources in your streaming software to use the new URLs, which can be found under Settings -> Overlay.
- Overlay Widgets are now vastly more robust in the amount that can be customized for them. However, the differences in specific HTML formatting between old and new versions are incompatible and thus can not be directly migrated over. The vast majority of standard, drop-down or input values are converted over, but customized HTML can not be and is instead changed to the new format. All old customized HTML can be accessed from the Overlay Widgets page by editing the widget and clicking on the History button in the top-right corner of the window.
- Certain features and functionality have been removed due to their low usage and may be replaced in the future.
- The Web Page option has been removed due to low compatability with more websites, but web page can be added manually via the HTML option. Existing Web Page actions have been updated to this new setup via the HTML option.
- The Ticker Tape Overlay Widget has been removed and instead replaced with the comparable Label Overlay Widget. Due to their large differences, the Ticker Tape Overlay Widget was not migrated and must be manually re-created as a Label Overlay Widget.
Overlay Action

Overlay actions allow you to use Mix It Up’s overlay webpage to dynamically add visual effects to your stream. Whether you are using OBS, XSplit, or another streaming software, you can simply add the Overlay to your stream to take advantage of it.
If you do not have Overlay interaction set up, you’ll see an error message stating “Please enable Mix It Up Overlay in the Services Section!”. See the Overlay Services page for more information.
Overlay Actions can be divided into one of two groups, dynamic visual and Overlay Widget interactions:
Overlay Dynamic Visuals (Text, Images, Videos)
Dynamic visuals are things that can be displayed on the Overlay for a set period of time. These are useful for commands when you want to show something temporarily such as some text, an image, or a video clip. Each of these options allows you to set a Duration amount for how long the visual will be shown for. The Duration amount supports Special Identifiers and in some cases can be left blank for certain types that will dynamically determine how long to show it for based on the media.
All dynamic visuals let you specify where it should be positioned. When picking where to show the Overlay Action, you have access to the following options:
- Simple: Shows the visual in one of 9 locations on the screen

- Percentage: Shows the visual at a specific percentage position from the top and left side of the Overlay

- Pixels: Shows the visual at a specific pixel position

- Random: Shows the visual at a random location within the range of left and top pixel positions

All dynamic visuals also have animations that can be applied to them. Each one has a base Entrance and Exit animation based on the Duration, but additional animations can be added that will trigger at specific times you set:

Text
The Text Overlay Action allows you to show a set of text on your stream. This can be useful for showing something such as the username of a person that just followed of subscribed.
The Max Width option allow you to set a maximum width for a set of text before it will attempt to wrap the text to the next line. For example, setting the Max Width to 200 will make it so that any text longer than 200 pixels in width will continue to wrap until the end of the text:

Image
The Image Overlay Action allow you to show an image on your stream. This can be useful for showing something like a funny image or a user’s avar.
When selecting an image via the Windows Open File dialog, multiple images can be selected. This will randomly pick one of the selected images each time the Overlay Widget is shown / refreshed.
You can optionally specify a width and/or height for the image or leave the fields blank and it will use the native size of the image when it’s displayed. If only width or height is specified, it will use proportional calculation to scale the other based on what was specified and the actual size of the image.
Video
The Video Overlay Action allows you to show a video on your stream. The video file path specified can either be a local or online-hosted video file.
Video Overlay Actions support not specifying a Duration amount and will play the entire length of the video if one is not specified.
The Loop option allows you to have the video repeatedly play back-to-back.
You can optionally specify a width and/or height for the video or leave the fields blank and it will use the native size of the video when it’s displayed. If only width or height is specified, it will use proportional calculation to scale the other based on what was specified and the actual size of the video.
The Start Time option allows you to set at what second into the video it will start playing.
The Volume slider allows you to set the overall volume level of the video. If you wish to control the audio device that the video is played over, you must either change the default audio device selected in Windows -or- control the audio of the web browser source containing this Video Overlay Action within your streaming software.
YouTube
The YouTube Overlay Action is useful for showing a persistent YouTube video on your stream. The YouTube video URL supports many different text formats and supports Special Identifier replacement.
YouTube Overlay Actions support not specifying a Duration amount and will play the entire length of the video if one is not specified.
Because YouTube videos do not have a specific resolution set for them, you must specify both width and height for the video.
The Start Time option allows you to set at what second into the video it will start playing.
The Volume slider allows you to set the overall volume level of the video. If you wish to control the audio device that the video is played over, you must either change the default audio device selected in Windows -or- control the audio of the web browser source containing this Video Overlay Action within your streaming software.
HTML
The HTML Overlay Action allows you to show free-form HTML within the Overlay. These are particularly useful when you want to show a very basic display of something that requires a bit more customization than one of the standard types.
Timer
The Timer Overlay Action allows you to show a timer for a specific amount of seconds based on the Duration amount specified. The timer can optionally be toggled to count up from 0 to the Duration instead of counting down to 0 from the Duration.
The display format for how the timer is shown can customized. For information on how to use this, please see the Timer Display Formats section.
Twitch Clip
The Twitch Clip Overlay Action allows you to show a Twitch Clip from a variety of different sources. The majority of options allow you to specify a specific username to grab a clip for based on the type selected (EX: Latest Clip will grab the latest available clip for the user specified). The Specific Clip option allow you to specify a URL to a specific Twitch clip to play and supports many URL formats.
This option provides the following special identifiers which can be used in other actions in your command:
- $twitchclipduration = The duration of the Twitch clip that was selected
Emote Effect
The Persistent Emote Effect Overlay Action allows for the display of emotes on your Overlay in various visual effects. This includes effects like raining emotes, emote explosions, and more. You are able to select the specific type of animation that is applied to the emotes or use the Random option to have it randomly apply an animation each time the emote effect is triggered.
All emote text specified in the Emote Text field will be used for selection. Each emote must be space separated and Special Identifiers are supported. A common usage may be to leverage the $allargs Argument Special Identifier $message Special Identifier found on Chat Commands
The Duration, Width, and Height options allow you to define how long the emote(s) appear for and their display size.
The Per Emote Shown option allows you to set how many emotes are shown on screen for each emote that is in the chat message. For example, if a chat message has 3 emotes in it and the Per Emote Shown option is set to 5, then 5 emotes will be shown for each of the emotes in the chat message with a total of 15 emotes shown (3 * 5).
The Max Amount Shown option limits the total number of emotes that will be shown, regardless of how many are specified.
The Allow URLs option allows you to include image URLs in the effect as well.
The Allow Emoji option allows you to include standard emojis and emoticons in the effect as well.
Overlay Widget Interactions
Overlay Widget Interactions allow you to control certain aspects of Overlay Widgets from within regular commands. The options available will be specific to each Overlay Widget and not all Overlay Widgets have interaction points via the Overlay Action.
Enable/Disable Widget
The Enable/Disable Widget option allows you to enable/disable a specific widget or otherwise thought of as show/hide them. While an Overlay Widget is disabled, no functionality is running or being tracked by the Overlay Widget.
Damage Stream Boss
The Damage Stream Boss option allows for dynamic damage/healing can applied to the current Stream Boss Overlay Widget. The amount specified will be directly added/subtracted to the boss when it is triggered. This can be useful for non-standard events, such as a Twitch Channel Point Reward that can add an damage to the boss.
If a positive number is specified, this will apply damage. If a negative number is specified, this will heal the boss by that amount.
If the user that triggered the command is also the current stream boss, then it will always heal the boss.
If the “Force Damage” option is toggled, this will always apply damage to the boss, even if the user that triggered the command is the current stream boss.
Add To Goal
The Add To Goal option allows for amounts to be added/subtracted from the a Goal Overlay Widget. The amount specified will be directly added/subtracted to the goal when it is triggered. This can be useful for non-standard events, such as a Twitch Channel Point Reward that can add an amount to the goal.
Add To Persistent Timer
The Add To Persistent Timer option allows for amounts to be added/subtracted from a Persistent Timer Overlay Widget. The amount specified will be directly added/subtracted to the timer when it is triggered. This can be useful for non-standard events, such as a Twitch Channel Point Reward that can add an amount to the timer.
Pause/Unpause Persistent Timer
The Pause/Unpause Persistent Timer options allows you to pause or unpause a Persistent Timer Overlay Widget. While paused, the timer will not continue to count down.
Add To End Credits
The Add To End Credits option allows you to add dynamic items to a Custom section for an End Credits Overlay Widget. By selecting the “Add To End Credits” option, you will be able to select the corresponding End Credits Overlay Widget and the custom section you want to add an item to. The “Text” text box is what will replace the “{Text}” property in the Item Template, meaning whatever you type in “Text” is what will get shown.

Play End Credits
The Play End Credits option allows you to trigger the start of the End Credits Overlay Widget based on the current information it has been tracking.
Add To Event List
The Add To Event List option allows you to add events to an Event List Overlay Widget. The user that triggered the command will be the user shown in the top-portion of the event and the text specified in the “Details” box will be what appears in the bottom-portion of the event:

Spin Wheel
The Spin Wheel option allows you to perform a spin of a Wheel Overlay Widget.
Run Widget Function
The Run Widget Function option allows you to dynamically call a Javascript function defined in an Overlay Widget. This option is usable with all Overlay Widgets, but it becomes particularly useful with Custom Overlay Widgets simply due to the nature of them being custom.
When using the option, specify both the name of the function you want to call in the Javascript of the Overlay Widget + any parameters you want to pass in:
